Tuesday, December 14, 2010

Holiday Gift Fair

 About a month ago I was asked by some friends to join in on having a garage sale where moms who make crafty things could set up a table and sell their stuff.  People who don't have time to commit to the Farmers Market or other convention type events.  We had such a huge response that my mother and sister-n-law offered for us to use their parking lot at one of their daycares.  We had only a few weeks to get our crafting on and a few days to advertize.  We also had to compete with several bigger craft fairs going on that day as well, but all in all we had a good turn out and most of all we had fun. There were so many cute vendors there, but I didn't have time to venture out to all the booths long enough to get pictures.  Maybe I can find them and post about their things later. 

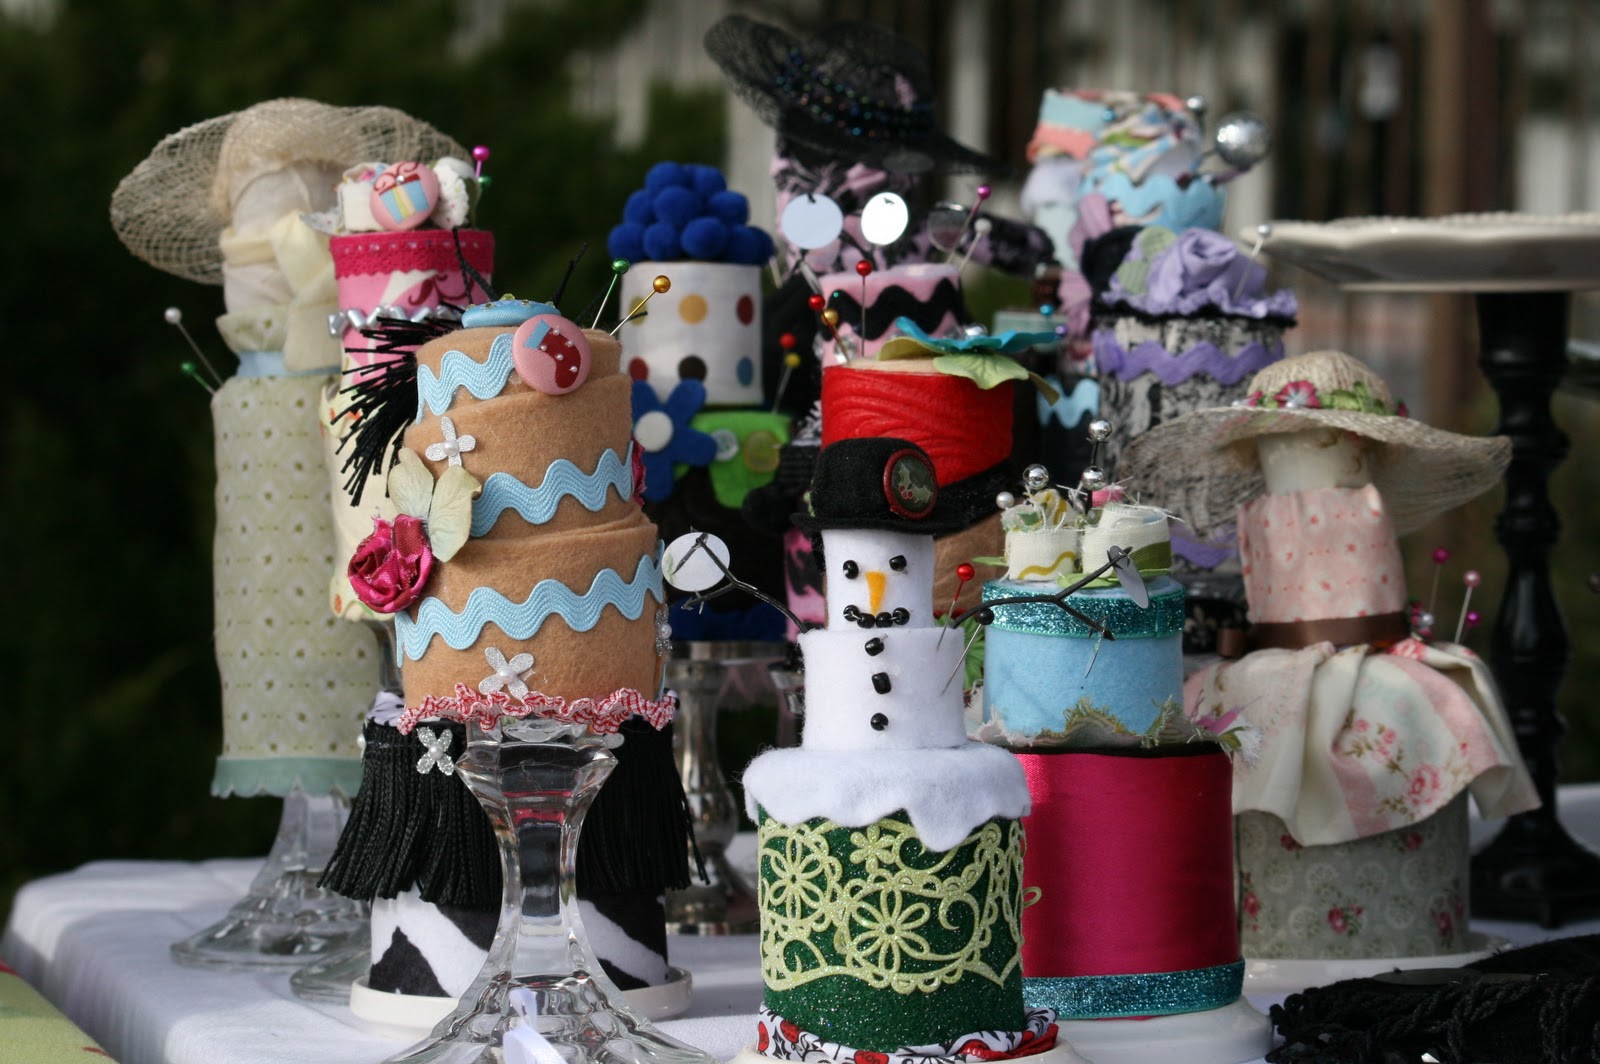
At my booth I had my Shelf Reliance things (food storage, http://www.shelfreliance.com/); educating people about that and booking parties.  I'm hoping to start a blog about Shelf Reliance after Christmas.  I also made some pin cushions that I found from the website http://www.diydish.com/ (double layer cake pin cushions and the owl pin cushions).  I also made platters from that website as well. 

 I add to put my own spin on the cake pin cushion by making a few to look like girls in dresses.  By just covering the felt differently and adding a hat that you would use when making dolls it totally transforms it.  I think another spin on the platters (which I would've done if I had more time) would've been to add some sort of vinyl silhouete design on top.  I think that would be very cute.  I basically was looking for something that was fast and easy to make.  Also something that unique and could be given as a gift.  Check out the DIY Dish website, they have so many ideas. 

Friday, December 19, 2008

Silhouette images capturing life!

If you haven't checked out the company Designer's Holiday yet and thought about what you would do if you could put your imagination on your wall, etc then I highly suggest you do it. This is an image of my sister-n-law and her husband on their wedding day walking up to the temple. I loved the picture and wanting to capture it in a silhouette for their Christmas gift. Same with the temple and their daughter. She has lady bugs as decoration in her room and I thought I'd carry on the theme. I'm way excited to do more projects in my own home this year.


Before....


After...


Before...

After...


Before...

After...

Thursday, December 4, 2008

An idea is born!


I can remember when my friend Heidi sitting in my livingroom telling me about this home business that she and her husband were going to do and it gave me goose bumps. I thought it was so clever and a much needed personalized element to add to a home. It's funny because I was having a really hard time trying to come up with something unique and different from everyone else in terms of decorating. With this everyone can personalize their home or anywhere else you can think of. The possibilities are endless! Whatever you imagine! I must warn you, that it's very hard to stop thinking about what you would do once you see the options of the vinyl designs. Here's a picture of a bedroom done for her little girl. It's just precious! I'm adding her blog to my favorite's and will have the website for you in the future. http://www.designersholiday.blogspot.com/
How cute is this! This labeling options gives us no excuse for not being able to find anything right! That is...if it's in the right place. ha ha

Wednesday, November 19, 2008

Baby Onesie and Burp Cloth Sets


I have so many friends who are having babies right now I just can't believe it! Luckily I found this cute idea to make for a baby gift that is somewhat easy (depending on how fancy you get) and low cost as well. If you don't want to worry about heming, just sew around the design leaving a 1/4 of an inch of fabric, snip the edges, wash and you have a cute freyed edge. All of these are freyed except of the boy one because I'm lazy like that. :)

This is just a baby cloth diaper and then you sew fabric on it making a hem all the way around. Just pin, press with warm iron and sew around twice.
On the corners you basically just fold it like you would when you're wrapping a gift, press and pin. So simple. I've done some in the past that I've tie-dyed, or have just sewn ribbons on the onesies across the chest or on the arms,etc. People always seem to like them because they're one of a kind. In the future I'd like to add baby booties or matching stretch hair bands.

Baby Shower Onesie Cake


There's all kinds of onesie cakes if you google it, but this cake I tried to have look like the little onesie set I made my friend. (Although I had to make the cake brown since she wanted chocolate). It's pretty easy. You bake a cake in just your regular 11x14 cake pan. Cool and take it out of your pan onto your serving board. Measure in on the bottom a couple of inches on each side of the bottom corner and cut a curve. Take those pieces and glue them with icing onto the top of the cake to make arm sleeves. Cut out a neck line and then use a butter cream icing for decorating. (I made the mistake of using the store bought icing and it wasn't firm enough). So, yours will probably turn out way better if you use a butter cream frosting. Have fun!

Autumn Leaves Table Runner

This is pretty easy to do. It just takes a few hours, a hot glue gun, fake leaves (you can make it any season you want), and some felt.

1.Start by cutting out your felt to the size of your table. it doesn't have to be perfectly straight because you'll cover the edges.


2. Pull off the leaves from the garland.

3. Glue


I forgot to take a picture of the finished product, but you get the point. It looks nice on a table.


High Contrast Mobile

High Contrast Colors are great for a babies brain development so I thought I make one (semi-homemade anyway) this time around. I found a great website http://www.giggle.com/ and got this really cool mobile for $10 and thought it would be great for it's versatility as I will want to change pictures in the future.

I basically got some pictures from the Internet and glued them on some thin cardboard from a toaster strudel box and clipped them on. Voila! I ran out of pictures so I thought fake flowers might be neat to look at too. Bella loves it so much. She'll just kick and squeal at the pictures.

Button Mirrors

I love buttons. As a kid my mom had an old plastic peanut butter bucket FULL of all different kinds of buttons and I'd spend a lot of time just looking at them wondering what a person could do with all of those buttons.
I was wondering how I could dress up a full length mirror that I had hanging in my daughters room and I thought that buttons would be cute. I made one for my mother-n-laws daycare for her baby room also. After hot glueing all of the buttons on we brushed on some epoxy to make it hard so babies couldn't pick on the buttons and chock on them. Plus, it makes it so shiny.
I've also in the past have glued buttons on the last few inches of a table skirt and it looks darling. The posibilities are endless when it comes to buttons.


Wednesday, October 22, 2008

Tutu's

I've always wanted to learn how to make Tutu's and I came across a website www.misspictureperfect.com that's sells the instructions and so I bought them and went right to work. This Tutu is sort of an Autumn color scheme. I wanted to have more ribbons and sew on these cute little autumn leaves, but I'm way too busy and thought that Fall would be over by the time I finished the project. I'm having lots of fun making these and so anyone in my extended family who wants a Tutu for their girls will probably get one! :)

Monday, October 6, 2008

Wedding Reception (Entry Way)

This job that I was asked to help with was so much fun and the pictures do not do it justice. I was asked to be in charge of decorating the entry way in our church for a wedding reception and just didn't know what I was going to do. I didn't really have a budget except to be as cheap, but as tasteful as possible...so that was another challenge. Anyways, this was the end result! Thanks Cody and Mary plus your husband John for your help and advice!


Like I said earlier, the pictures do not capture how good everything looks. I was so proud! I wanted the foyer to have a sort of garden theme and so as you walked into the front doors you were greeted with the relaxing sound of a fountain which we later surrounded with more fabric and lights on the base of the fountain. Then, as you walked in we had ivy garlands everywhere! Also a little garden bench surrounded by plants. I wish I would've taken video or something!

I ended up making most everything on this table because I just couldn't find what I had envisioned. The box cake had a slot on top for people who wanted to give cards. My battery in my camera was dead before the wedding so I was bumbed that I didn't quite get the whole effect at the end. The wedding was in the evening so the lighting was wonderful and next to this table there was a large divider screen with pictures of the couple at the wedding the previous day and of their engagement.

This is looking at the center of the ceiling. As you can see the ceiling is very tall with this 70's style light fixture that I had to work with. So, we dressed it up. I covered styrofoam balls with a mixture of fake flowers, pearls and hung them at different intervals with ribbon that matched the bridesmaid's dresses. Mary had some Christmas ornament's that went perfect. Viola!

A DOG BED FIT FOR A QUEEN!

My niece got a Yorkshire Terrier (more like a Yorkshire Terror ha ha) for her birthday and so I thought that I'd try to make her a dog bed. Her name was going to be Princess Chloe and since Brooke's room is decorated in her school colors; Orange, Black and White I figured that I'd try to match it.
I basically bought padding used for seat cushions and just upholstered it. A thick piece of padding in the middle and for the arms a just folded a thin piece of cushion and glued/hand sewed it in place. This is the end result and thank goodness Chloe liked it. One thing I did forget to do was iron on a little golden crown on the black part of the bed to further accentuate the "Princess" Chloe name. I had already sewn it into place and didn't want to have to start all over. I'm happy with the end result.